PostgreSQL Database Backup and Restore: Complete Guide with DBeaver and pg_dump
Database backups are essential for any production system. Whether you're protecting against hardware failures, accidental data deletion, or preparing for migrations, having a solid backup strategy is non-negotiable. In this guide, we'll explore two powerful approaches to backing up and restoring PostgreSQL databases: using DBeaver's graphical interface and the pg_dump command-line tool.
Understanding Database Backups
A database backup creates a snapshot of your data at a specific point in time. This allows you to restore your database to that exact state if something goes wrong. For PostgreSQL, there are several backup strategies available, but we'll focus on logical backups using pg_dump and DBeaver, which generate SQL scripts or binary archives that can be restored on any PostgreSQL server.
Installing pg_dump on macOS
Before diving into backup operations, you'll need to have PostgreSQL client tools installed. The pg_dump utility comes bundled with PostgreSQL, so installing PostgreSQL gives you access to all the necessary tools.
Using Homebrew (Recommended)
Homebrew is the easiest way to install PostgreSQL on macOS. If you don't have Homebrew installed yet, run this command in your terminal:
/bin/bash -c "$(curl -fsSL https://raw.githubusercontent.com/Homebrew/install/HEAD/install.sh)"Once Homebrew is ready, install PostgreSQL:
brew install postgresqlThis command installs the complete PostgreSQL package, including the server and all client utilities like pg_dump, pg_restore, and psql.
Verify the installation by checking the version:
pg_dump --versionYou should see output similar to:
pg_dump (PostgreSQL) 16.2Using pg_dump: Command-Line Backup
The pg_dump utility is PostgreSQL's primary tool for creating logical backups of individual databases. It's flexible, powerful, and scriptable, making it ideal for automated backup workflows.
Basic Syntax
The general syntax for pg_dump is:
pg_dump -h hostname -p port -U username -d dbname -f output_fileCommon Backup Scenarios
1. Plain SQL Format Backup
This creates a human-readable SQL script that can be executed with psql:
pg_dump -h localhost -U postgres -d mydb -f backup.sql2. Custom Compressed Format
The custom format is compressed and allows selective restoration:
pg_dump -h localhost -U postgres -d mydb -F c -f backup.dumpThe -F c flag specifies custom format, which offers the best compression and flexibility.
3. Schema-Only Backup
Sometimes you only need the database structure without data:
pg_dump -h localhost -U postgres -d mydb --schema-only -f schema.sql4. Specific Tables Backup
To back up only certain tables:
pg_dump -h localhost -U postgres -d mydb -t table1 -t table2 -f tables.sql5. Data-Only Backup
To export just the data without schema definitions:
pg_dump -h localhost -U postgres -d mydb --data-only -f data.sqlUseful pg_dump Options
- -F format: Output format (p=plain, c=custom, d=directory, t=tar)
- -v: Verbose mode for detailed logging
- -Z level: Compression level (0-9)
- --no-owner: Exclude ownership information
- --no-acl: Exclude access privileges
- -j jobs: Number of parallel jobs for directory format
Backing Up with DBeaver
DBeaver provides a user-friendly graphical interface for database operations, including backups. It's particularly helpful for those who prefer visual tools or need to perform occasional backups without memorizing command-line syntax.
Step-by-Step Backup Process
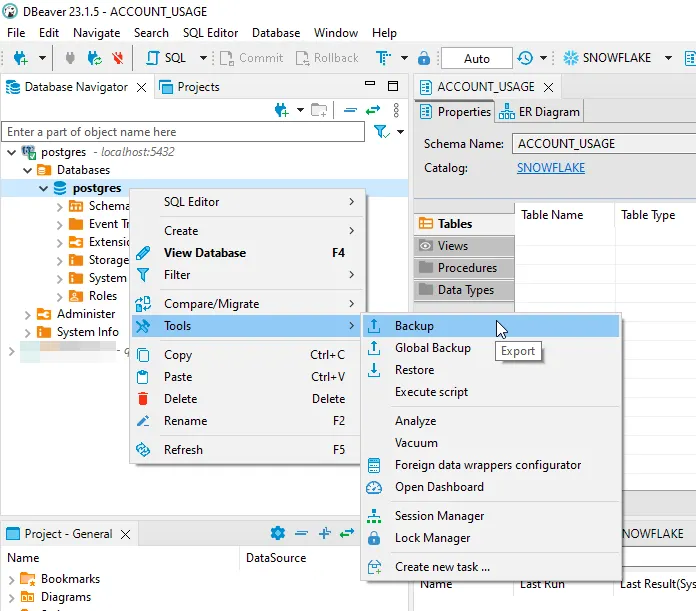
Step 1: Access the Backup Tool
In DBeaver, navigate to your database in the Database Navigator. Right-click on the database you want to back up, then select Tools → Backup.
Step 2: Choose Objects to Export
The backup wizard will open. In the first screen, you'll see your database schema and tables. Select the objects you want to include in the backup. You can choose the entire public schema or select specific tables.

Click Next to proceed to backup settings.
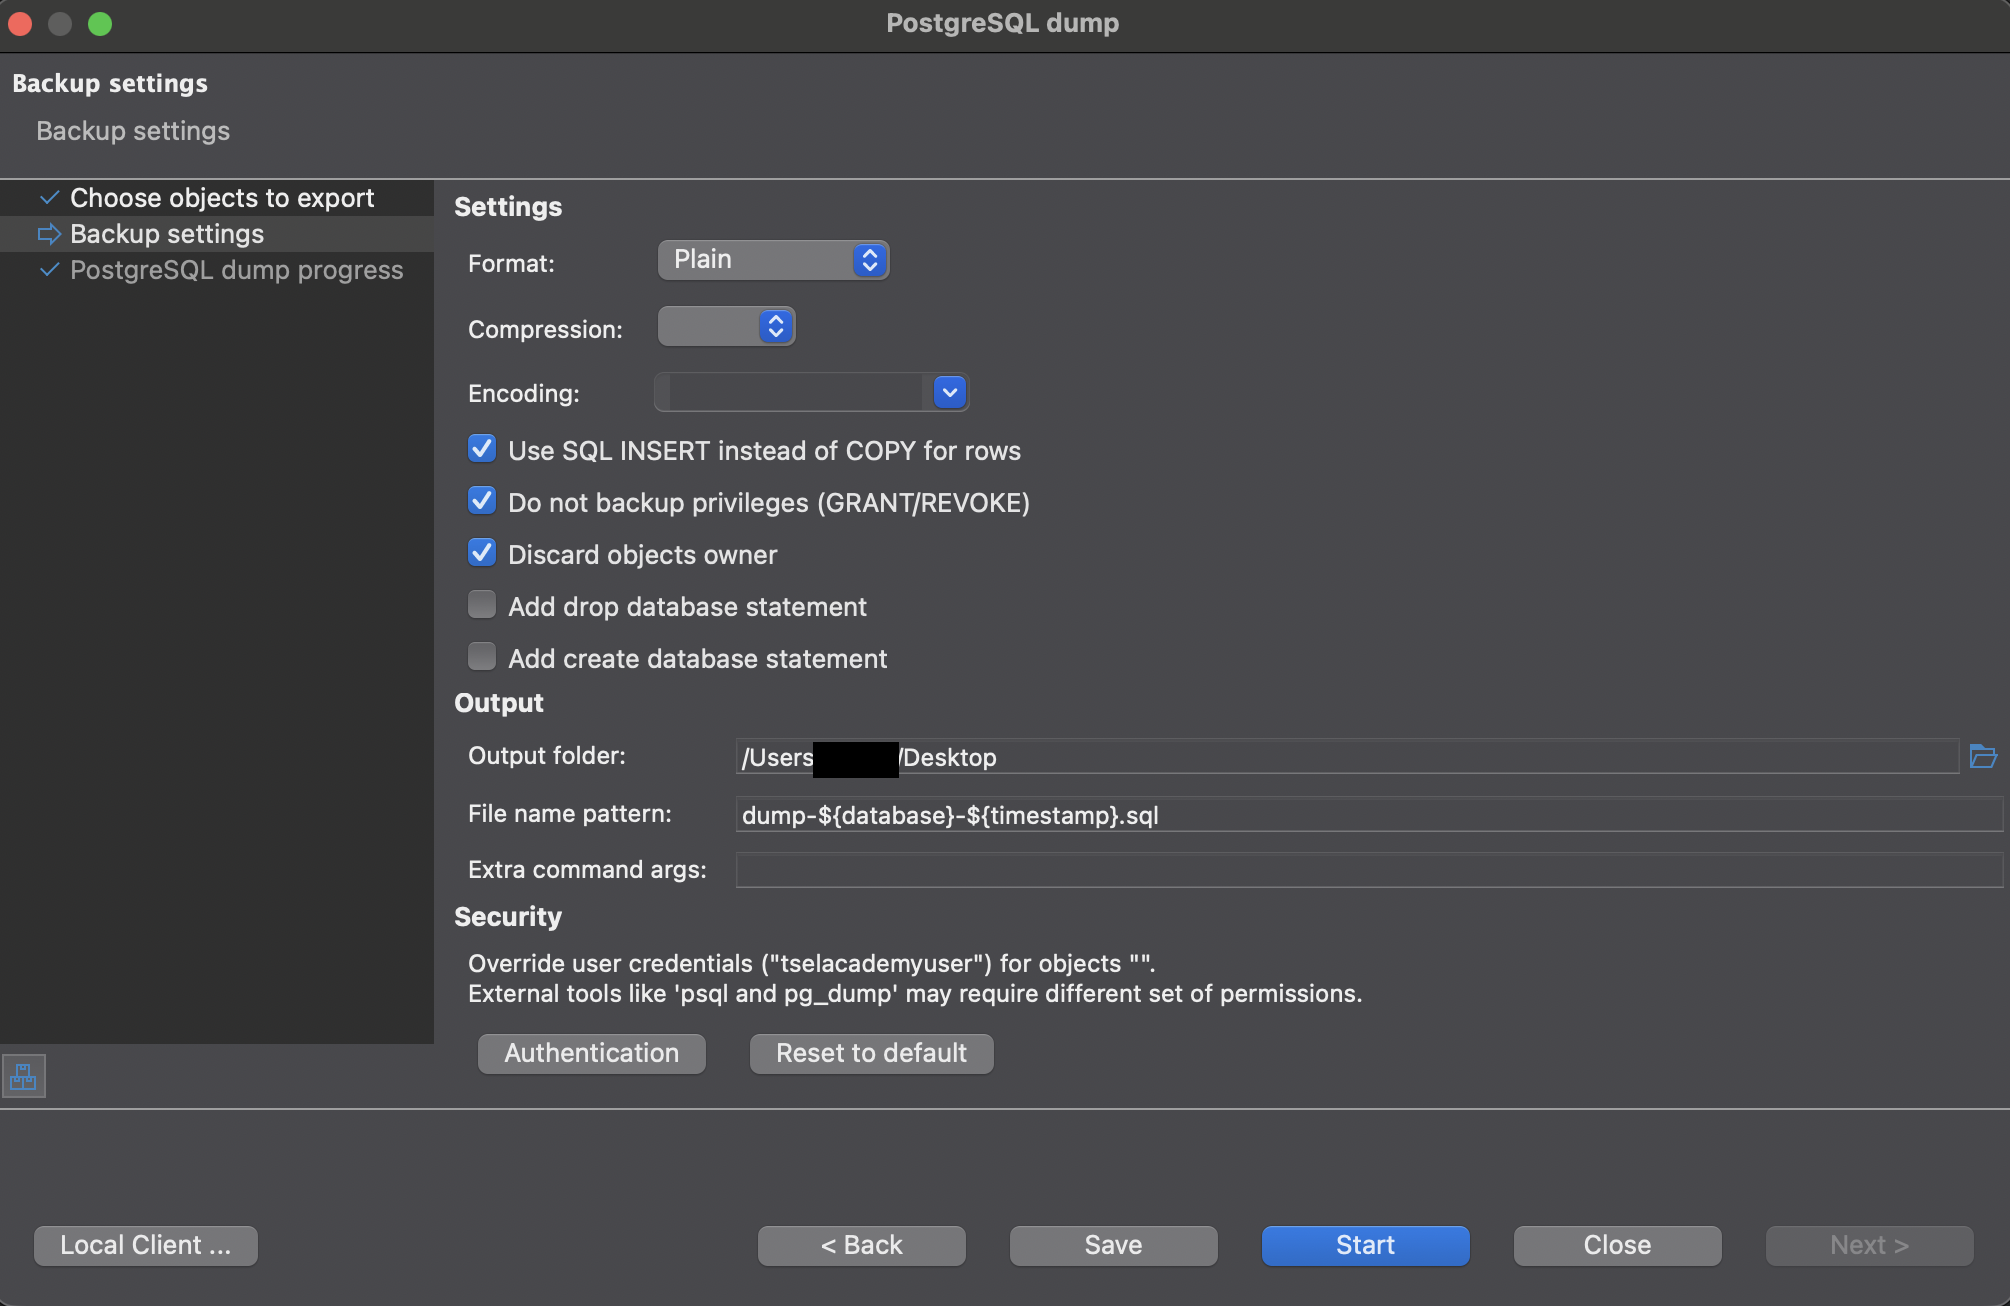
Step 3: Configure Backup Settings
The backup settings screen offers several important configuration options:
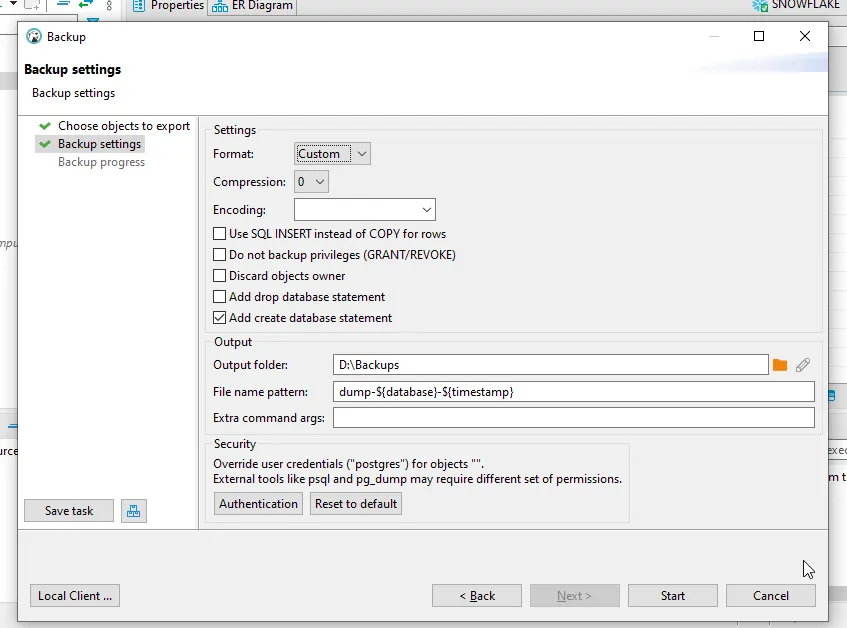
Key settings to configure:
- Format: Choose between Directory, Tar, Custom, or Plain
- Custom: Best for most use cases - compressed and allows selective restore
- Plain: Creates a readable SQL script
- Directory: Splits backup into multiple files, good for large databases
- Tar: Creates a tar archive
- Compression: Set compression level (0 for none, up to 9 for maximum compression)
- Encoding: Select character encoding (usually UTF-8)
- Use SQL INSERT instead of COPY for rows: Creates INSERT statements instead of COPY commands
- Do not backup privileges (GRANT/REVOKE): Excludes permission statements
- Discard objects owner: Removes ownership information
- Add create database statement: Includes CREATE DATABASE command in backup
- Output folder: Specify where to save the backup file
- File name pattern: Customize the backup filename (use variables like ${database} and ${timestamp})
For authentication, you can override credentials if needed by clicking the Authentication button.
Step 4: Start the Backup
After configuring all settings, click Start to begin the backup process. DBeaver will execute the pg_dump command with your chosen settings.
Step 5: Monitor Progress
The backup progress screen shows detailed logs of the operation:
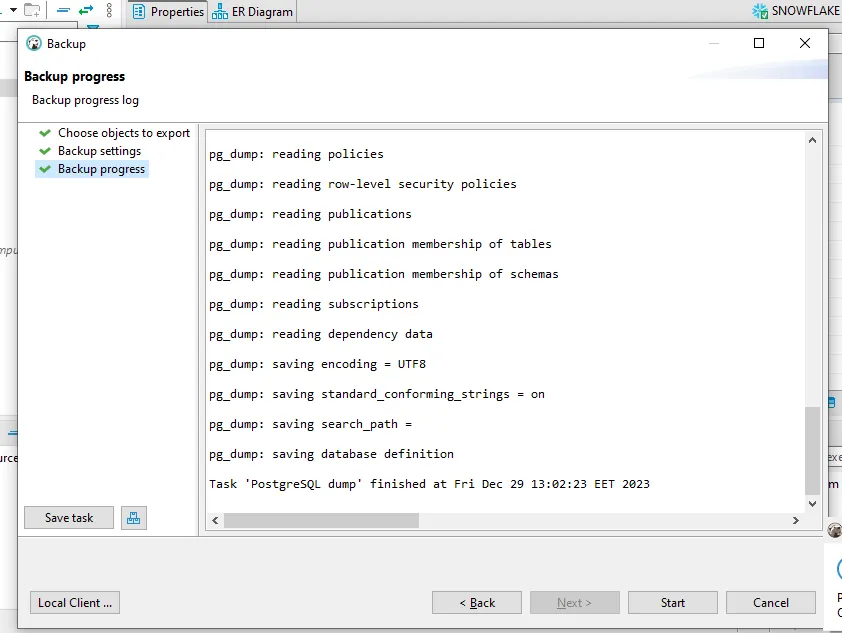
You'll see pg_dump reading various database objects, policies, and saving the data. Once complete, you'll get a confirmation message with the backup location.
Restoring with DBeaver
Restoring a database is just as straightforward as backing it up in DBeaver.
Step-by-Step Restore Process
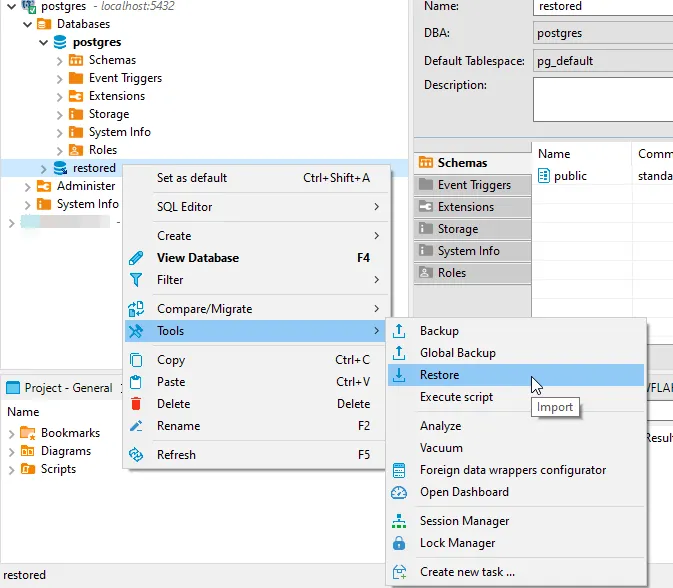
Step 1: Access the Restore Tool
Right-click on the target database (or create a new empty database first) and select Tools → Restore.
Step 2: Configure Restore Settings
In the restore settings dialog, configure the following options:
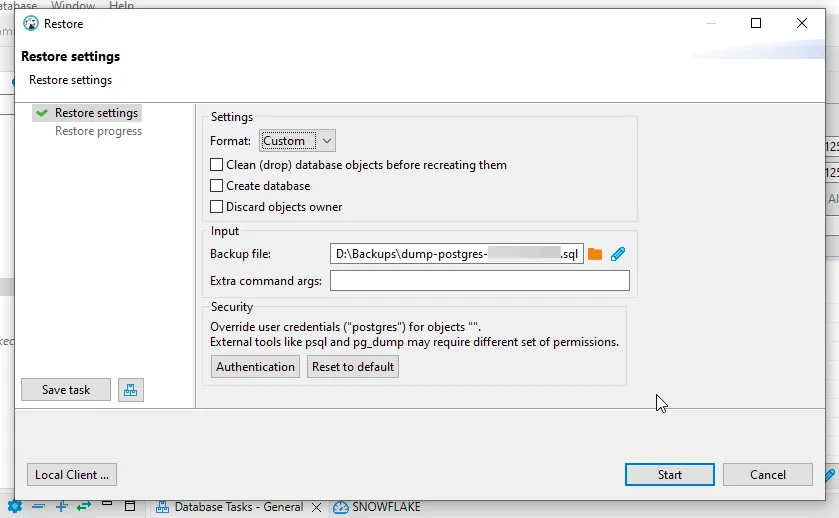
Important settings:
- Format: Must match your backup format (Custom, Plain, Directory, or Tar)
- Backup file: Select the backup file you want to restore
- Clean (drop) database objects before recreating them: Removes existing objects first
- Create database: Creates the database if it doesn't exist
- Discard objects owner: Ignores ownership information from the backup
Warning: Be careful with the "Clean" option as it will drop existing database objects before restoring. Make sure you have a backup of the current state if needed.
Step 3: Start the Restore
Click Start to begin the restoration process. DBeaver will use pg_restore (for custom/tar/directory formats) or psql (for plain SQL format) to restore your data.
Step 4: Verify the Restore
After restoration completes, verify your data by:
- Checking table row counts
- Running sample queries
- Verifying critical data integrity
- Testing application connectivity
Important: Cleaning Dump Files Before Restore
When working with PostgreSQL dump files (especially those created with the plain SQL format), you may encounter issues during restoration due to platform-specific or hosting provider-specific commands embedded in the dump file. These commands can prevent successful imports if not removed.
Common Issue: Transaction Restriction Commands
Some PostgreSQL hosting providers (like certain cloud platforms) add custom transaction control commands to their dumps. These commands typically look like:
\restrict u7gJDWKe1JjVKcRwRdjRwej6naLijov2FhKMG0QrUm23oBNprEpv4UxCiVWyhaw
SET transaction_timeout = 0;
\unrestrict u7gJDWKe1JjVKcRwRdjRwej6naLijov2FhKMG0QrUm23oBNprEpv4UxCiVWyhaw
These commands use proprietary meta-commands (\restrict and \unrestrict) that are not part of standard PostgreSQL. If you try to restore a dump file containing these commands to a different PostgreSQL instance, the restore will fail with errors.
Step-by-Step: Inspecting and Cleaning Your Dump File
Step 1: Open the Dump File
Before attempting to restore, open your SQL dump file in a text editor. You can use any editor like Visual Studio Code, Sublime Text, or even vim:
In the example above, you can see a dump file named dump-dbname-202604182341.sql opened in an editor, revealing the problematic \restrict and \unrestrict commands.
Step 2: Search for Problematic Commands
Use your editor's search function (usually Ctrl+F or Cmd+F) to find these patterns:
\restrict\unrestrict- Any other non-standard PostgreSQL meta-commands
Step 3: Remove the Commands
Delete all lines containing these proprietary commands. Be careful to remove:
- The entire
\restrictline with its token - Any SET commands between
\restrictand\unrestrictthat are provider-specific - The entire
\unrestrictline with its token
Important: Only remove proprietary meta-commands. Do not remove standard PostgreSQL commands like:
- Standard SET commands (SET statement_timeout, SET client_encoding, etc.)
- CREATE, ALTER, INSERT statements
- Standard PostgreSQL meta-commands like
\connect
Step 4: Save and Test
After removing the problematic commands:
- Save the modified dump file
- Consider keeping a backup of the original dump file
- Attempt the restore operation again
# Restore the cleaned dump file
psql -h localhost -U postgres -d target_db -f dump-dbname-202604182341.sql
When Do You Need to Clean Dump Files?
You typically need to clean dump files when:
- Moving databases between different PostgreSQL hosting providers
- Migrating from managed PostgreSQL services (like AWS RDS, Heroku Postgres, etc.) to self-hosted instances
- Restoring dumps that contain cloud provider-specific extensions or commands
- You encounter errors mentioning unrecognized meta-commands during restore
Preventing Issues with Custom Format
To avoid these issues altogether, prefer using the custom format (-F c) instead of plain SQL format when creating backups:
pg_dump -h localhost -U postgres -d mydb -F c -f backup.dumpCustom format backups:
- Are more portable between different PostgreSQL environments
- Don't include proprietary meta-commands
- Offer better compression
- Allow selective restoration of specific tables or schemas
Best Practices for Database Backups
1. Automate Your Backups
Manual backups are prone to being forgotten. Set up automated backup scripts using cron jobs or scheduled tasks:
#!/bin/bash
# Daily backup script
DATE=$(date +%Y%m%d_%H%M%S)
BACKUP_DIR="/backups/postgresql"
DATABASE="mydb"

pg_dump -h localhost -U postgres -d $DATABASE -F c -f "$BACKUP_DIR/backup_${DATABASE}_${DATE}.dump"

# Delete backups older than 30 days
find $BACKUP_DIR -name "backup_*.dump" -mtime +30 -delete
2. Test Your Backups Regularly
A backup is useless if it can't be restored. Regularly test your backup files by restoring them to a test environment. This ensures that:
- The backup files are not corrupted
- Your restore procedure works correctly
- Recovery time objectives are achievable
3. Store Backups in Multiple Locations
Follow the 3-2-1 backup rule:
- 3 copies of your data
- 2 different storage media
- 1 copy stored off-site (cloud storage, remote server)
4. Use Compression
Database backups can be large. Using compressed formats (like custom format with compression level 6-9) can significantly reduce storage requirements and transfer times.
5. Document Your Recovery Procedures
Maintain clear documentation of your backup and restore procedures. Include:
- Backup schedule and retention policy
- Exact commands used for backup and restore
- Location of backup files
- Contact information for database administrators
- Step-by-step recovery instructions
6. Monitor Backup Success
Implement monitoring to alert you if backups fail. Log all backup operations and review logs regularly:
pg_dump -h localhost -U postgres -d mydb -F c -f backup.dump -v 2>&1 | tee backup.log
if [ ${PIPESTATUS[0]} -eq 0 ]; then
    echo "Backup successful"
else
    echo "Backup failed!" | mail -s "Backup Alert" admin@example.com
fi
Common Issues and Troubleshooting
Authentication Failed
If you encounter authentication errors, check:
- Username and password are correct
- pg_hba.conf allows connections from your client
- PostgreSQL is running and accepting connections
- Use
-Wflag to force password prompt:pg_dump -U postgres -W -d mydb -f backup.sql
Permission Denied
Your database user needs sufficient privileges. Grant necessary permissions:
GRANT CONNECT ON DATABASE mydb TO backup_user;
GRANT USAGE ON SCHEMA public TO backup_user;
GRANT SELECT ON ALL TABLES IN SCHEMA public TO backup_user;
Out of Disk Space
Large databases can fill up disk space quickly. Solutions:
- Use compression:
pg_dump -F c -Z 9 - Pipe directly to gzip:
pg_dump -d mydb | gzip > backup.sql.gz - Use directory format for parallel dumps:
pg_dump -F d -j 4 -f backup_dir
DBeaver Shows "Local Client" Error
DBeaver needs to know where your PostgreSQL client tools are installed. Click Local Client... in the backup/restore dialog and select the correct PostgreSQL installation path.
On macOS with Homebrew installation, the path is typically:
/opt/homebrew/bin (Apple Silicon) or /usr/local/bin (Intel)
Conclusion
Database backups are your safety net against data loss. Whether you prefer the flexibility of pg_dump's command-line interface or the convenience of DBeaver's graphical tools, PostgreSQL provides robust options for protecting your data.
Key takeaways:
- Install PostgreSQL client tools via Homebrew on macOS
- Use pg_dump for scriptable, automated backups
- Use DBeaver for convenient, visual backup operations
- Always test your backups by restoring them
- Store backups in multiple locations
- Automate and monitor your backup processes
Remember: the best backup strategy is one that runs automatically, gets tested regularly, and can be restored quickly when disaster strikes. Don't wait for data loss to happen—implement a solid backup strategy today.